


Contents

On-demand webinar
How Good is My Shield? An Introduction to Transfer Impedance and Shielding Effectiveness
by Karen Burnham
When designing an HDI PCB stack-up, you need to choose the right build-up architecture and define a via strategy that supports the routing density and impedance needs.
For example, use microvias to breakout fine-pitch BGAs, select a 1+N+1 or 2+N+2 build-up depending on fanout difficulty, and ensure symmetrical layer construction to maintain manufacturability and reliability.
Likewise, pick materials with stable Dk/Df for high-speed interfaces and validate every stack-up choice with your fabricator’s lamination and laser-drill capabilities.
In this article, you’ll learn when to choose high-density interconnect boards, how HDI PCB stack-ups are classified, steps to estimate the layer count, and the design guidelines that help you build a reliable and manufacturable printed circuit.
Highlights:
- Use HDI when routing density, fine-pitch BGAs, or high-speed interfaces exceed what through-hole vias can support.
- Select the right build-up category from IPC-2226 types (I-VI) or i+N+i notation.
- Choose microvia, blind, buried, or via-in-pad structures based on breakout requirements.
- Maintain stack symmetry and pair ground/power planes to improve PDN performance and reduce warpage.
HDI PCB market projection (2025-2031)
Global HDI PCB market size
The global high-density printed board market is valued at USD 20.75 billion in 2025 and is expected to reach USD 40.73 billion in 2031. The market is forecasted to grow at a CAGR of 12% from 2025 to 2031.

High-density PCB market size in the United States
The US HDI circuit board market is valued at USD 4.15 billion in 2025 and is expected to reach USD 7.33 billion in 2031. The market is forecasted to grow at a CAGR of 10% from 2025 to 2031.

Source: Sierra Circuits’ market research analysis report (derived from the annual reports of PCB industry leaders and research reports published by associations like IPC).
When to choose HDI boards over standard PCBs
Pick an HDI PCB stack-up when your design has fine-pitch BGAs (≤0.50 mm) that require via-in-pad or stacked microvias. High-density interconnect is also preferred when high-speed interfaces demand higher routing density and tighter power-ground coupling than a standard board.
The table below highlights the key design conditions that help you decide whether an HDI or a standard stack-up is the better choice.
| Design condition | Standard PCB | HDI PCB |
|---|---|---|
| BGA pitch/escape density | Pitch ≥0.65 mm, dog-bone fanout is sufficient | Pitch ≤0.50 mm, via-in-pad or stacked microvias are required |
| Signal layers required for breakout | 1-2 | ≥4 |
| Interface speed | Low-moderate speed (GPIO, I²C, SPI, UART) | High-speed (DDR4/5, PCIe Gen4+, SerDes, MIPI, RF) |
| Routing density | Low net count, wider trace widths (≥4 mil) | Dense buses and differential pairs |
| Via strategy | Through-holes | Via-in-pad, blind/buried, stacked microvias |
| Board thickness and form factor | Standard thickness acceptable | Ultra-thin, lightweight, compact modules |
| Power delivery network (PDN) | Standard decoupling and plane spacing | Tightly coupled power-ground planes for low PDN impedance |
| Reliability constraints | Thick boards with through-hole vias, low cycling stress | Fine-pitch BGAs, short return paths, reduced via depth |
| Applications | Industrial control, power boards, basic embedded systems | Smartphones, wearables, high-performance compute, SiP modules |
Early feasibility check
Before selecting the stack-up, verify if the densest BGA or fine-pitch package (in your design) can be routed using standard through-hole or dog-bone fanout. If yes, you can opt for a standard build-up.
If your layout requires microvia-based via-in-pad or stacked microvias, HDI is required regardless of net count or interface speed.

Rule of thumb for computing breakout signal layers
Required signal layers for breaking out a BGA = (pins per BGA side/2)/(number of traces between BGA pins)
This equation is an estimate to determine the number of signal layers. To accurately calculate the number of signal and plane layers, the BGA pinout and net connections need to be analyzed.
| Via structure | Typical pitch range (in mm) | Stack-up type | What this means |
|---|---|---|---|
| Through-hole dog-bone | ≥0.65 (often 0.8 – 1.0) | Standard |
|
| Microvia/via-in-pad | 0.4 – 0.5 | HDI |
|
| Stacked filled microvias | ≤0.4 (0.3 and below) | Advanced HDI |
|
If four or fewer (≤4) signal layers are required for breakout, a standard stack is likely sufficient. If the number of signal layers exceeds 5 layers, you may require an HDI PCB stack-up.
Most 0.50 mm BGAs require high-density interconnect. BGAs with 0.65 – 0.80 mm pitch may be routable on standard stacks depending on the via strategy, I/O density, and spacing rules.
For more on breakout strategies, see:
For high-density layout strategies, download the HDI PCB Design Guide.

HDI PCB Design Guide
5 Chapters - 52 Pages - 60 Minute ReadWhat's Inside:
- Planning your stack-up and microvia structure
- Choosing the right materials
- Signal integrity and controlled impedance in HDI
- Manufacturing considerations for higher yields
Download Now
How are high-density stack-ups classified?
HDI boards are commonly classified using two parallel systems:
- IPC-2226 HDI types
- i+N+i notation
As an HDI PCB designer, you need to understand both systems to communicate effectively with fabricators, specify manufacturability requirements, and compare stack-up options.
1. IPC-2226 HDI types
The IPC classifies high-density build-ups based on how the core and microvia layers are arranged.

The table below shows the classification in detail.
| IPC type | Description | Via structures | Microvia layers | Routing capability | Use case | Cost/ complexity |
|---|---|---|---|---|---|---|
| Type I | Laminated core with through-hole vias | Blind microvias + PTH (microvias land on capture pads) | Single microvia layer on one or both sides | Limited; microvia access is restricted to the layer adjacent to the core |
|
Low |
| Type II | Laminated core with internal buried vias in the core | Blind + buried vias + PTH | Single microvia layer on one or both sides | Moderate; buried vias free up core routing space and reduce via depth |
|
Medium |
| Type III | Laminated core with two or more sequential build-up layers | Stacked or staggered microvias + buried vias + PTH | Two or more sequential microvia layers | Excellent; supports dense stacked microvia fanout, enabling maximum breakout flexibility |
|
High |
| Types IV-VI | Coreless or alternate constructions (e.g., build-up on a coreless base, heat-spreading cores, ALIVH, co-lamination) | Fully stacked microvia systems | Varies | Good; well-suited for ultra-high-end, very thin, or thermal-constrained applications |
|
Very high |
2. i+N+i (or M+N+M) sequential build-up
This notation directly describes the number of sequential HDI build-up layers added to each side of a central core. Fabricators typically use i+N+i notation to describe buildable stack-ups.
In i+N+i (or M+bN+M)
- i or M: describes the number of build-up layers on each outer side.
- N: defines central core layer stack (may include buried vias).
- b (optional): indicates buried vias in the core.
Example:
- 2+10+2: two build-up layers per side, 10-layer core
- 1+b8+1: single build-up per side + buried vias in an 8-layer core
| Notation | Description | IPC equivalent | When to choose | Characteristics | Use case |
|---|---|---|---|---|---|
| 1+N+1 | One HDI build-up layer per side of the core | Type I or II |
|
|
|
| 2+N+2 | Two HDI build-up layers per side | Type III |
|
|
|
| 3+N+3 | Three HDI build-up layers per side | Type III (higher complexity) |
|
|
|
| 4+N+4 | Four or more HDI build-up layers per side | Type III (very high build-up count) |
|
|
|
| Every layer interconnect (ELIC) | Stacked, copper-filled microvias allow any-layer-to-any-layer routing | Not IPC-classified |
|
|
|
When buried vias are present in the core, fabricators may use the notation M+bN+M to explicitly indicate the buried-via structure.
Use IPC HDI types for documentation and compliance, whereas i+N+i when talking to fabricators and comparing quotes.
Need HDI boards? Talk to a PCB expert: Book a meeting or call us at +1 (800) 763-7503.
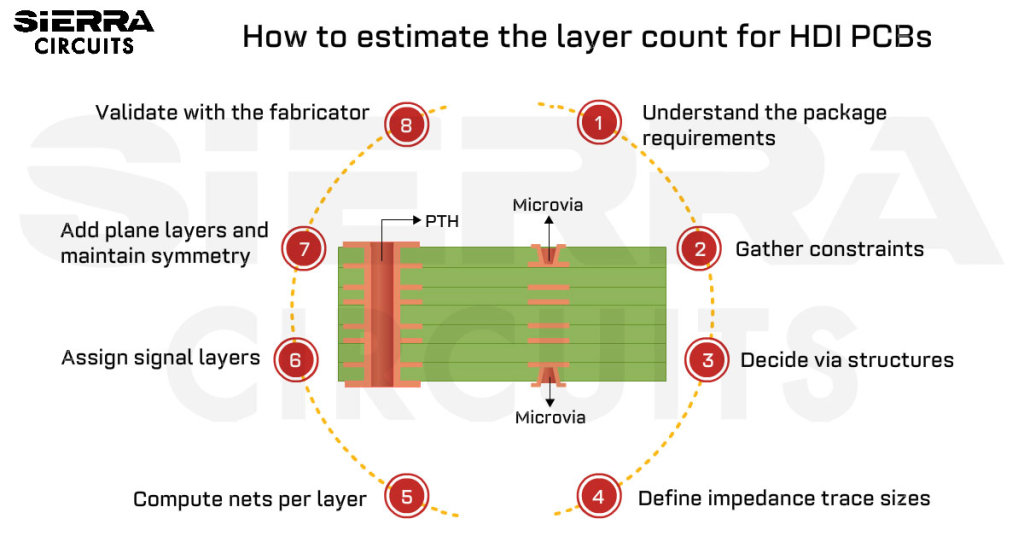
How to estimate the layer count for your HDI build-up
To determine the optimum count, evaluate how many routing planes are required to escape BGAs, route all nets, meet impedance targets, and maintain stack symmetry. The final number is driven by routing density and via strategy and should be validated by your fabricator.
Let’s look into the steps in detail.
Step-1: Understand the requirements of ICs and interfaces
- Identify all major ICs, especially fine-pitch BGAs, SoCs, FPGAs, PMICs, RF transceivers, etc.
- Determine required interfaces (PCIe, DDR, MIPI, SERDES, Ethernet, USB, RF front-end, etc.)
- Classify which interfaces require impedance control, shielding, or dedicated planes.
- Map expected breakout density under each IC region.
This step sets the routing topology and strongly influences whether HDI is required at all.
Step-2: Gather constraints
- Count total nets and isolate high-speed, differential, timing-critical, and analog nets.
- Identify the densest BGA pitches and pin counts as they define the most critical routing region.
- Document mechanical constraints such as board thickness, connector types, flexible zones, and mechanical keep-out areas.
- Establish cost targets, manufacturing yield expectations, and acceptable lead times.
- Identify environmental constraints, including shock, vibration, temperature range, and material capabilities.
To learn how proper layer orientation improves signal integrity and reduces EMI, read PCB layer orientation.
Step-3: Decide via strategy
- Choose among microvias, blind vias, and buried vias.
- Determine whether the HDI PCB stack-up will require stacked vias or staggered vias.
- Decide via-in-pad requirements and select the appropriate via fill type.
Via strategy directly determines routing channels per layer and lamination cycles required.
Step-4: Define impedance and determine trace sizes
- Set target impedances (50 Ω SE, 90/100 Ω differential, etc.) and tolerance (±10%).
- Use a field solver to map the required trace width and spacing to the target impedance on each routing layer.
- If the calculated widths violate escape routing limits, adjust the dielectric thickness or transition to a high-density interconnect stack-up.
- Select dielectric thicknesses from materials and thickness options that your fabricator can supply.
Prepreg thickness varies up to ±10-15%, so tolerance control is critical.
For more on high-density laminate selection, see how to choose the right HDI PCB materials.
Step-5: Compute nets per layer
- Estimate routing density based on the trace-width and spacing rules.
- Multiply by the available routing width within the high-density region.
- For BGA devices, assume approximately two escape channels per row (three channels if aggressive microvia rules are used).
If the total number of nets exceeds the available routing capacity, add signal layers or change the via strategy.
For HDI routing tips, see top 5 HDI PCB routing challenges and ways to mitigate them.
Step-6: Assign signal layers
- Increase signal layers if buses or differential pairs exceed the routing capacity.
- Separate analog, RF, and digital domains when needed.

Step-7: Add plane layers and maintain symmetry
- Place ground planes adjacent to critical signal layers.
- Use power/ground pairs to lower PDN impedance.
- Balance copper and dielectric thickness to avoid warpage.
- Keep the number of signal and plane layers both odd or both even (preferably both even), and place them symmetrically about the centerline. Maintain matching dielectrics on both sides to reduce warpage. If perfect symmetry isn’t possible, balance copper weights and dielectric thicknesses.
- Estimate the number of power and ground layers based on the number of required ground references, the number of significant voltage rails, and the signal-integrity and impedance-control requirements.
To learn how to design stack-ups for high current capacity and thermal performance, read how to design a high-power PCB stack-up.
Step-8: Validate with the fabricator and iterate
- Confirm minimum microvia diameter, stack materials, and lamination cycle count.
- Check the microvia aspect ratio against your fabricator’s design guidelines (via depth vs diameter).
- Prefer the simplest HDI architecture that meets routing and signal, and power integrity goals. Avoid unnecessary via structures and lamination variants that add cost and risk without clear benefit.
- Modify the stack-up if the design exceeds any manufacturing limits, for example, by adding layers, selecting thinner dielectrics, or switching to staggered vias.
- Run signal-integrity and power-integrity simulations to validate the final stack-up.
- Review the full process flow (sub-constructions, sequential lamination steps, laser drills, fills, and plate cycles) with your fabricator to understand and control cost and yield.
After determining the required number of signal and plane layers using the workflow above, refer to the IPC and i+N+i classification tables to identify the HDI build-up structure that best fits your routing density and via strategy. These classifications help you understand whether a 1+N+1, 2+N+2, or more advanced architecture is appropriate.
Sierra Circuits utilizes self-learning automated scaling software (XACT) to ensure precision in HDI stack-up design. The system analyzes material type, thickness, and copper weight on each layer to accurately predict and compensate for material shrinkage.
Visit HDI PCB capabilities to learn more.
11 design tips to build a reliable HDI PCB stack-up
- Place continuous ground planes adjacent to high-speed signal layers. This creates controlled transmission lines, minimizes loop area, reduces radiation, and provides a stable return path.
- Prefer closely coupled ground and power plane pairs to increase plane capacitance, lower PDN impedance at mid-frequency ranges, and reduce the need for additional decoupling components.
- Choose laminates with stable Dk (<3 – 3.5) and low Df (<0.02 and ideally <0.001) across operating frequencies.
- Select materials with a glass transition temperature (Tg) higher than the soldering temperature to minimize assembly-induced board stress and ensure compatibility with lead-free reflow profiles.
- The graph shows that the typical Tg for a standard FR4 is between 130°C and 140°C, making it suitable for moderate operating temperatures. High-Tg FR4 offers a glass transition temperature greater than 170°C. When selecting FR4 for your design, choose the variant that best suits your operating temperature.

Glass transition temperature (Tg) of FR4 variants.
- The graph shows that the typical Tg for a standard FR4 is between 130°C and 140°C, making it suitable for moderate operating temperatures. High-Tg FR4 offers a glass transition temperature greater than 170°C. When selecting FR4 for your design, choose the variant that best suits your operating temperature.
- Use materials with low CTE (≤70 ppm in the z-axis) to reduce via fatigue and ensure strong CAF resistance.
- Prefer copper foils with low surface roughness to reduce high-frequency conductor loss; rolled copper is ideal, but low-profile, very-low-profile, and hyper-low-profile electrodeposited (ED) foils are strong alternatives.
- Materials like Panasonic Megtron 6 (Dk = 3.4, Df = 0.004 at 18 GHz) offer these low-roughness ED options, making them suitable for high-speed and RF designs even without rolled copper.
- Evaluate materials based on their ability to withstand circuit board laser drilling procedures and sequential lamination. Choose flat glass clothes with high resin content, such as 1035, 1067, and 1086.
- Consider resin content, glass style, and copper roughness for signal integrity in HDI PCB. Opt for densely woven fiberglass weaves such as 1078, 1035, 3313, and 1067 to minimize the fiber weave effect.
- Prefer rolled copper foils rather than traditional electrodeposited (ED) copper foils.
- Use skip vias to avoid stacked microvias, but only when build-up layers are thin enough to meet aspect-ratio limits. Place skip vias from the top layer to deeper core layers (e.g., L1→L3) and pair them with staggered blind/buried vias instead of stacking to improve reliability. Ensure the total outer dielectric thickness supports a manufacturable aspect ratio under fine-pitch BGAs.
- Perform PDN impedance analysis early. Use a target impedance curve for the domain and ensure that your plane stack and decoupling strategy meet the target over the relevant frequency range.
For more, download the PCB Stack-up Design Guide.
PCB Stack-Up Design Guide
12 Chapters - 55 Pages - 60 Minute ReadWhat's Inside:
- Design guidelines for HDI, flex, and hybrid stack-ups
- Stack-up representation in fab drawing
- DFM checks for layer stacks
- Characteristics of high-speed materials
- Manufacturing tolerances
- PCB stack-up examples with illustrations
Download Now
Examples of standard high-density stack-up configurations
Below are practical stack-up templates that serve as useful starting points. Actual dielectric thicknesses, copper weights, and materials should always be adjusted based on your fabricator’s capabilities.
4-layer
This entry-level HDI configuration is suitable for moderate-complexity designs where a single ground plane provides adequate return paths.

6-layer
Offers improved PDN performance and additional inner routing capacity. A good fit for compact designs combining small RF sections with digital logic.

8-layer
A balanced HDI PCB stack-up that provides multiple adjacent ground planes for high-speed or noise-sensitive signals, along with additional escape routing for fine-pitch BGAs.

10-layer
Well-suited for larger FPGAs, SoCs, and designs with many HDI nets. Inner layer pairing can be tuned to optimize PDN and impedance requirements.

14-layer
Intended for highly integrated designs with both RF and digital domains. Use skip vias or buried vias where needed, and monitor PTH aspect ratios if traditional through-hole vias remain in the stack.

Use the Stackup Designer to generate your HDI build-up in a go.
Every layer interconnect (ELIC)
An advanced stack-up using multiple microvia build-ups on both sides with copper-filled stacked microvias and buried via cores. This approach is suitable only if the fabricator supports true ELIC processes and reliable copper fill.

Building a reliable HDI PCB stack-up depends on choosing the right structure, defining a robust via strategy, and matching materials and impedance needs with your fabricator’s capabilities.
About the technical reviewer:
Dilip Kumar is the Senior Design Manager at Sierra Circuits with over a decade of experience in developing high-speed and HDI PCB designs featuring fine-pitch BGAs. He is proficient in Altium Designer, Cadence Allegro, Eagle PCB, KiCAD, and AutoCAD.
Leading a team of skilled PCB designers and layout engineers, he oversees projects from concept to production, ensuring precision and manufacturability at every stage. Dilip consistently delivers innovative, high-quality designs that meet demanding engineering and business objectives.
Need assistance building your HDI PCB stack-up? Post your queries on our PCB forum, SierraConnect. Our design and manufacturing experts will help you select one.

About Pooja Mitra : Pooja Mitra is an electronics and communication engineer. With an experience of over three years in the PCB industry, she creates industry-focused articles that help electrical and PCB layout engineers.


Start the discussion at sierraconnect.protoexpress.com