Contents

On-demand webinar
How Good is My Shield? An Introduction to Transfer Impedance and Shielding Effectiveness
by Karen Burnham
Thanks to some VR magic, you can now tour Sierra Circuits from YouTube. Our brand new 360 video will take you to our Sunnyvale, CA facilities just like you were there for real.
Visit Sierra Circuits manufacture and assembly with our new 360 video.
Checking for fab and assembly
The first stop on the tour is the check-in department. Here our specialists review design files to ensure they are within spec and are manufacturable. Once approved, an immediate quote and engineering feedback are provided, along with a PCB material stack-up.
After an order is placed, we move into our CAM department. Here we run the design rule checks for fabrication and assembly. We also model your impedance based on the presumed press-out thickness. At this point a traveler and tool number are created for machine programming, allowing us to catch potential errors before they happen.
The traveler is our way of tracking orders along each step of the process which in turn provides traceability. Machine operators log notes to help ensure quality and progress.
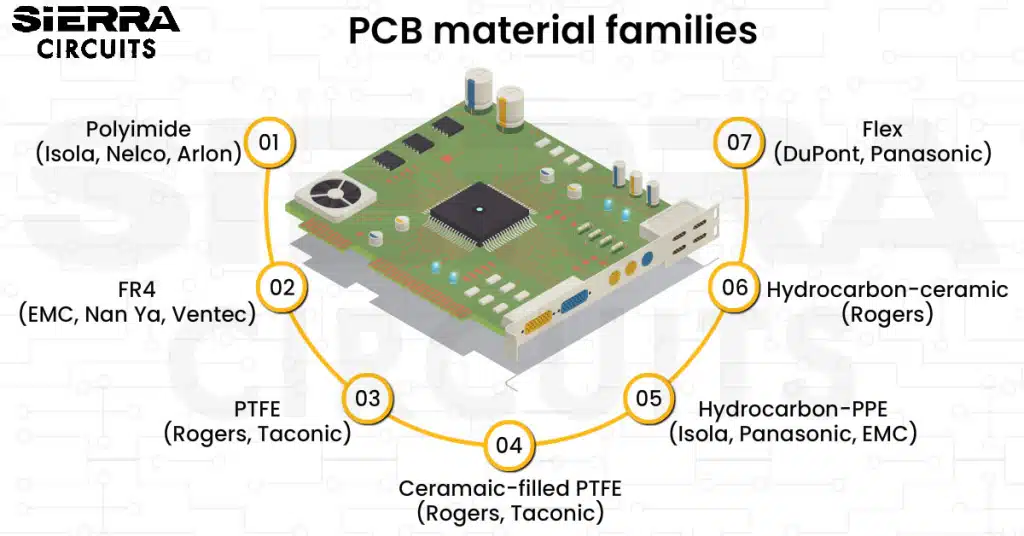
PCB materials
In our PCB material room, you will find a wide array of materials with every glass style and copper thickness available. We readily stock and maintain high speed and other long lead time materials.

Imaging lab
Then comes our imaging lab. Before imaging, we apply a blue resist on top of the copper. Then we use our laser direct imaging machine to expose the blue resist. Using LDI allows us to go down to 1-mil trace and space and also provides a better layer to layer registration. And then its on to etching.
Etching is the process of removing the copper which eventually forms the traces and pads.
Lamination
During the lamination process, the stack-up is used to build the book or foil construction– an assembly of dielectric materials made up of core and prepreg. Then after baking, the prepregs melt, fusing all the copper layers together. It is important to have good repeatability in lamination from lot to lot to create consistent press-out thicknesses.
Following lamination, copper layers can shift in the X and Y. Our Pluritech machines are used to understand the shift and optimize drill location and precision.
Drilling
Our PCB drilling facility runs ‘round the clock using top of the line Hitachi machines. We also have vision drill capabilities which allows for plus or minus 1-mil tolerance on hole placement. And while each drill bit can withstand 300 hits, Sierra changes bits at 200 hits because drilling a clean hole is critical to quality.
Here, our laser routing lab hums with state of the art C02 and YAG machines, both highly effective for routing intricate outlines on rigid and flex PCBs. These machines are also used to drill micro vias down to 3 mils.

Surface finished and solder mask
While boards are in plating, live monitoring systems are active to ensure that the copper and PH levels are maintained and accurate. We offer all surface finishes in house– gold, ENIG, ENEPIG and silver.
Now comes our solder mask lab. While green is the most common color, we also hand-mix any color needed. It is important to screen mask with a machine to get consistent thickness for your next process. Because we image our mask with LDI we can hold very tight solder mask dams.
Cross-section
Here in our cross-sectioning lab, we examine every board for quality assurance, creating coupons to measure for copper, dielectric thickness, etchback, wicking and good hole wall plating.
Here in our testing lab, both sides of the board are tested simultaneously to ensure the current runs successfully for a given net. We use IPC 356A to test.
PCB Assembly
Our PCB assembly is the final leg of the tour. Here our Juki pick and place machines are used for improved flexibility and production quality. Juki is ideal for quickturn prototypes. Before pick and place, we run an automatic solder paste deposition machine. After pick and place, we run AOI and X-ray to ensure good solder joints.
This is just a glimpse inside Sierra Circuit’s manufacturing and assembly process. For a more up close and personal experience you can reach out to our sales staff to book an appointment.
To fully enjoy this experience, you can take the tour with your VR goggles, like the Google cardboard for instance.

Design for Manufacturing Handbook
11 Chapters - 96 Pages - 90 Minute ReadWhat's Inside:
- Annular rings: avoid drill breakouts
- Vias: optimize your design
- Trace width and space: follow the best practices
- Solder mask and silkscreen: get the must-knows
Download Now