Contents
Multiple Reflows at Various Gold Thicknesses
Experimented by: Sneha Kaul and Christina Lum
Objective
To determine if multiple rounds of reflow detrimentally affect the surface condition of the gold plating at any thickness, using gold wire bonding as the test.
Boards pertaining to a particular customer design (see Figure 1) were collected in array form and selected based on their respective plating thickness. For this test, boards with approximately 1 µin, 2 µin, 3 µin, and 5 µin of gold were evaluated via wire bond testing after each round of three reflows without flux. In order to achieve these various gold thicknesses, such as 1 µin or 5 µin of gold, the plating time for the respective sample array had to be adjusted accordingly.
XRF ENEPIG Readings |
|||
| For 1 µin | For 2 µin | For 3 µin | For 5 µin |
| 1.1 µin Au
10.8 µin Pd 171.9 µin Ni |
1.8 µin Au 6.2 µin Pd 140.0 µin Ni |
3.0 µin Au 11.3 µin Pd 220.9 µin Ni |
5.8 µin Au 6.6 µin Pd 203.2 µin Ni |
|
1.2 µin Au 10.4 µin Pd 163.4 µin Ni |
1.9 µin Au
10.2 µin Pd 170.5 µin Ni |
2.7 µin Au
10.7 µin Pd 197.9 µin Ni |
4.4 µin Au 11.2 µin Pd 209.6 µin Ni |
Reflow Control Parameters |
|||
| Chamber | Temperature (ºC) | Chamber | Temperature (ºC) |
| 1T | 120 | 6T | 240 |
| 1B | 120 | 6B | 240 |
| 2T | 150 | 7T | 258 |
| 2B | 150 | 7B | 258 |
| 3T | 185 | 8T | 265 |
| 3B | 185 | 8B | 265 |
| 4T | 210 | 9T | 220 |
| 4B | 210 | 9B | 220 |
| 5T | 230 | 10T | 200 |
| 5B | 230 | 10B | 200 |
Before reflow, two boards (labeled as Board 1 and Board 2) from each array with either of the three thicknesses were wire bond tested to attain control values. Once the array underwent a round of reflow, the following two boards in the array were tested. For the three reflows, twenty-four boards (eight boards for each of the three thicknesses) were evaluated.
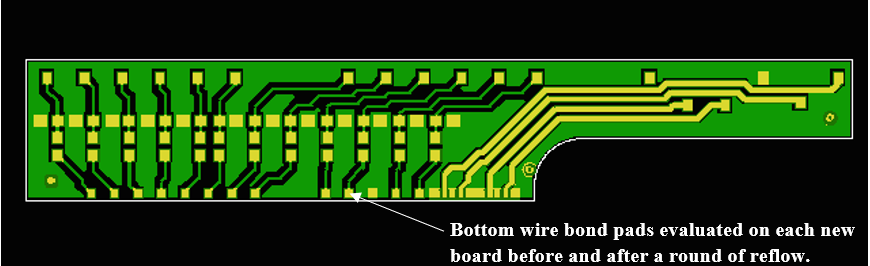
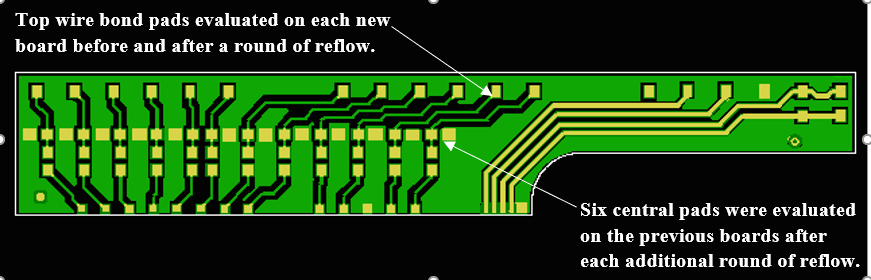
Figure 1: Design of #126756 (top), #131721 (top), and #130348 (bottom)
For every new board, the top and bottom wire bond pads were tested; first as a control on the first two boards and then on every board following one round of reflow. After every reflow, six central pads from the previously tested boards were evaluated as well in order to observe any new changes on the same board.
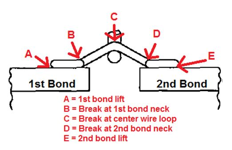
Per IPC-TM-650-2.4.42.3, gold wire bonding requires a minimum of 3.0 gram-force (gf) for the pull strength (resistance of the wire to withstand breakage). At the request of a customer, the break mode for this particular customer design is also evaluated for no wire breaks at points A or E (see figure to the right). Therefore for this test, any pull strength below 3.0 gf or breaks at any of the 5 points (A through E) were considered as fails.

Experimental Results
A. 1 µin of Gold
Before Reflow
| Board 1 | Board 2 | ||||
| Pull Strength (gram-force) | Break Mode | Result | Pull Strength (gram-force) | Break Mode | Result |
| 7.6 | B | Pass | 6.6 | C | Pass |
| 8.1 | B | Pass | 8.0 | B | Pass |
| 6.0 | B | Pass | 7.3 | B | Pass |
| 8.6 | B | Pass | 7.2 | B | Pass |
| 7.3 | B | Pass | 9.0 | B | Pass |
| 7.3 | B | Pass | 7.9 | B | Pass |
| 6.8 | B | Pass | 8.9 | B | Pass |
| 9.2 | B | Pass | 9.6 | B | Pass |
| 8.6 | B | Pass | 9.0 | B | Pass |
| 7.6 | B | Pass | 9.1 | B | Pass |
| 8.9 | B | Pass | 9.2 | B | Pass |
| 8.8 | B | Pass | 8.8 | B | Pass |
| 9.9 | C | Pass | 9.3 | B | Pass |
| 8.3 | C | Pass | 10.5 | B | Pass |
1st Round of Reflow
| Board 3 | Board 4 | ||||
| Pull Strength (gram-force) | Break Mode | Result | Pull Strength (gram-force) | Break Mode | Result |
| 8.7 | B | Pass | 5.8 | B | Pass |
| 8.5 | B | Pass | 8.7 | B | Pass |
| 8.1 | B | Pass | 8.4 | B | Pass |
| 7.7 | B | Pass | 7.7 | B | Pass |
| 7.4 | B | Pass | 5.6 | B | Pass |
| 7.3 | B | Pass | 8.0 | B | Pass |
| 9.7 | B | Pass | 9.8 | B | Pass |
| 10.2 | B | Pass | 8.6 | B | Pass |
| 8.9 | B | Pass | 11.4 | B | Pass |
| 8.0 | B | Pass | 8.2 | B | Pass |
| 7.6 | B | Pass | 7.7 | B | Pass |
| 8.2 | B | Pass | 7.6 | B | Pass |
| 7.9 | B | Pass | 8.6 | B | Pass |
| Board 1 | Board 2 | ||||
| Pull Strength (gram-force) | Break Mode | Result | Pull Strength (gram-force) | Break Mode | Result |
| 7.9 | B | Pass | 8.4 | B | Pass |
| 8.7 | B | Pass | 7.5 | B | Pass |
| 8.2 | B | Pass | 7.3 | B | Pass |
| 6.9 | B | Pass | 8.9 | B | Pass |
| 8.3 | B | Pass | 6.4 | B | Pass |
| 8.7 | B | Pass | 6.5 | B | Pass |
2nd Round of Reflow
| Board 5 | Board 6 | ||||
| Pull Strength (gram-force) | Break Mode | Result | Pull Strength (gram-force) | Break Mode | Result |
| 6.8 | B | Pass | 8.7 | B | Pass |
| 7.0 | B | Pass | 7.5 | B | Pass |
| 7.0 | B | Pass | 7.6 | B | Pass |
| 7.4 | B | Pass | 8.8 | B | Pass |
| 6.3 | B | Pass | 6.9 | B | Pass |
| 8.1 | B | Pass | 7.0 | B | Pass |
| 9.1 | B | Pass | 9.3 | B | Pass |
| 9.3 | B | Pass | 9.2 | B | Pass |
| 5.9 | E | Pass | 9.4 | B | Pass |
| 9.1 | B | Pass | 9.7 | B | Pass |
| 9.8 | B | Pass | 9.7 | C | Pass |
| 8.6 | B | Pass | 8.1 | B | Pass |
| 10.9 | B | Pass | 9.9 | B | Pass |
| 9.3 | B | Pass | 10.2 | B | Pass |
| Board 1 | Board 2 | ||||
| Pull Strength (gram-force) | Break Mode | Result | Pull Strength (gram-force) | Break Mode | Result |
| 6.1 | B | Pass | 7.9 | B | Pass |
| 7.1 | B | Pass | 7.1 | B | Pass |
| 8.3 | B | Pass | 6.8 | B | Pass |
| 8.3 | B | Pass | 7.8 | B | Pass |
| 8.7 | B | Pass | 7.4 | B | Pass |
| 7.0 | B | Pass | 8.4 | B | Pass |
| Board 3 | Board 4 | ||||
| Pull Strength (gram-force) | Break Mode | Result | Pull Strength (gram-force) | Break Mode | Result |
| 10.6 | B | Pass | 10.0 | B | Pass |
| 10.6 | B | Pass | 10.2 | B | Pass |
| 10.2 | B | Pass | 9.9 | C | Pass |
| 7.0 | B | Pass | 8.1 | B | Pass |
| 8.3 | B | Pass | 7.9 | B | Pass |
| 6.1 | B | Pass | 7.4 | B | Pass |
3rd Round of Reflow
| Board 7 | Board 8 | ||||
| Pull Strength (gram-force) | Break Mode | Result | Pull Strength (gram-force) | Break Mode | Result |
| 8.0 | B | Pass | 8.6 | B | Pass |
| 6.2 | B | Pass | 8.7 | B | Pass |
| 6.2 | B | Pass | 9.0 | B | Pass |
| 8.2 | B | Pass | 8.6 | B | Pass |
| 8.1 | B | Pass | 7.1 | B | Pass |
| 9.3 | B | Pass | 7.9 | B | Pass |
| 9.4 | B | Pass | 9.6 | B | Pass |
| 9.5 | B | Pass | 9.6 | B | Pass |
| 9.2 | B | Pass | 9.4 | B | Pass |
| 10.0 | C | Pass | 9.0 | B | Pass |
| 10.3 | B | Pass | 10.2 | B | Pass |
| 10.0 | B | Pass | 10.1 | B | Pass |
| 9.5 | B | Pass | 10.8 | B | Pass |
| 10.2 | B | Pass | 11.0 | B | Pass |
| Board 1 | Board 2 | ||||
| Pull Strength (gram-force) | Break Mode | Result | Pull Strength (gram-force) | Break Mode | Result |
| 7.4 | B | Pass | 5.8 | B | Pass |
| 8.6 | B | Pass | 8.2 | B | Pass |
| 7.0 | B | Pass | 8.5 | B | Pass |
| 7.5 | B | Pass | 8.2 | B | Pass |
| 7.4 | B | Pass | 7.4 | B | Pass |
| 7.4 | B | Pass | 8.9 | B | Pass |
| Board 3 | Board 4 | ||||
| Pull Strength (gram-force) | Break Mode | Result | Pull Strength (gram-force) | Break Mode | Result |
| 10.7 | C | Pass | 11.4 | B | Pass |
| 9.7 | B | Pass | 9.1 | B | Pass |
| 10.3 | B | Pass | 10.8 | B | Pass |
| 6.4 | B | Pass | 6.8 | B | Pass |
| 7.5 | B | Pass | 8.6 | B | Pass |
| 8.6 | B | Pass | 7.1 | B | Pass |
| Board 5 | Board 6 | ||||
| Pull Strength (gram-force) | Break Mode | Result | Pull Strength (gram-force) | Break Mode | Result |
| 7.6 | B | Pass | 7.9 | B | Pass |
| 7.7 | B | Pass | 7.9 | B | Pass |
| 6.9 | B | Pass | 4.3 | B | Pass |
| 6.8 | B | Pass | 8.0 | B | Pass |
| 5.9 | B | Pass | 6.7 | B | Pass |
| 7.4 | B | Pass | 7.8 | B | Pass |
B. 2 µin of Gold
Before Reflow
| Board 1 | Board 2 | ||||
| Pull Strength (gram-force) | Break Mode | Result | Pull Strength (gram-force) | Break Mode | Result |
| 8.3 | B | Pass | 7.6 | B | Pass |
| 6.5 | B | Pass | 7.2 | B | Pass |
| 7.3 | B | Pass | 7.1 | B | Pass |
| 7.1 | B | Pass | 8.7 | B | Pass |
| 6.7 | B | Pass | 7.8 | B | Pass |
| 7.2 | B | Pass | 7.8 | B | Pass |
| 7.1 | B | Pass | 8.7 | C | Pass |
| 7.9 | B | Pass | 8.8 | B | Pass |
| 8.4 | C | Pass | 7.9 | B | Pass |
| 9.3 | B | Pass | 8.9 | C | Pass |
| 8.7 | B | Pass | 9.0 | B | Pass |
| 9.5 | B | Pass | 8.2 | B | Pass |
| 9.6 | C | Pass | 9.7 | B | Pass |
| 10.3 | C | Pass | 9.1 | B | Pass |
1st Round of Reflow
| Board 3 | Board 4 | ||||
| Pull Strength (gram-force) | Break Mode | Result | Pull Strength (gram-force) | Break Mode | Result |
| 6.1 | B | Pass | 8.1 | B | Pass |
| 7.4 | B | Pass | 8.2 | B | Pass |
| 6.8 | B | Pass | 7.1 | B | Pass |
| 7.3 | B | Pass | 7.3 | B | Pass |
| 6.9 | B | Pass | 6.9 | B | Pass |
| 8.8 | B | Pass | 7.1 | B | Pass |
| 9.3 | B | Pass | 10.7 | C | Pass |
| 8.7 | B | Pass | 9.6 | B | Pass |
| 8.8 | B | Pass | 9.4 | B | Pass |
| 9.4 | B | Pass | 9.2 | B | Pass |
| 9.1 | B | Pass | 8.7 | B | Pass |
| 7.8 | B | Pass | 9.2 | C | Pass |
| 9.5 | B | Pass | 10.3 | B | Pass |
| 10.3 | B | Pass | 8.4 | B | Pass |
| Board 1 | Board 2 | ||||
| Pull Strength (gram-force) | Break Mode | Result | Pull Strength (gram-force) | Break Mode | Result |
| 7.9 | B | Pass | 7.8 | B | Pass |
| 7.2 | B | Pass | 6.7 | B | Pass |
| 8.9 | B | Pass | 5.8 | B | Pass |
| 8.3 | B | Pass | 8.3 | B | Pass |
| 5.7 | B | Pass | 8.7 | B | Pass |
| 8.1 | B | Pass | 6.6 | B | Pass |
2nd Round of Reflow
| Board 5 | Board 6 | ||||
| Pull Strength (gram-force) | Break Mode | Result | Pull Strength (gram-force) | Break Mode | Result |
| 8.9 | B | Pass | 7.9 | B | Pass |
| 7.7 | B | Pass | 8.3 | B | Pass |
| 8.0 | B | Pass | 7.4 | B | Pass |
| 8.2 | B | Pass | 5.6 | E | Pass |
| 8.5 | B | Pass | 7.4 | B | Pass |
| 7.5 | B | Pass | 6.2 | E | Pass |
| 8.9 | B | Pass | 9.4 | B | Pass |
| 9.1 | B | Pass | 9.7 | C | Pass |
| 9.4 | B | Pass | 9.6 | B | Pass |
| 8.0 | B | Pass | 9.6 | B | Pass |
| 8.4 | B | Pass | 9.5 | B | Pass |
| 9.6 | B | Pass | 8.6 | B | Pass |
| 7.8 | B | Pass | 10.4 | B | Pass |
| 10.2 | B | Pass | 9.2 | B | Pass |
| Board 1 | Board 2 | ||||
| Pull Strength (gram-force) | Break Mode | Result | Pull Strength (gram-force) | Break Mode | Result |
| 9.7 | B | Pass | 9.5 | B | Pass |
| 7.5 | B | Pass | 7.4 | B | Pass |
| 9.5 | B | Pass | 10.0 | B | Pass |
| 6.7 | B | Pass | 7.3 | B | Pass |
| 8.1 | B | Pass | 9.0 | E | Pass |
| 6.3 | B | Pass | 7.0 | B | Pass |
| Board 3 | Board 4 | ||||
| Pull Strength (gram-force) | Break Mode | Result | Pull Strength (gram-force) | Break Mode | Result |
| 8.0 | B | Pass | 8.0 | B | Pass |
| 9.4 | B | Pass | 3.1 | A | Pass |
| 8.3 | B | Pass | 8.3 | B | Pass |
| 8.8 | B | Pass | 8.9 | B | Pass |
| 8.7 | B | Pass | 6.9 | E | Pass |
| 7.4 | B | Pass | 8.1 | B | Pass |
3rd Round of Reflow
| Board 7 | Board 8 | ||||
| Pull Strength (gram-force) | Break Mode | Result | Pull Strength (gram-force) | Break Mode | Result |
| 7.4 | B | Pass | 7.6 | B | Pass |
| 6.8 | B | Pass | 7.5 | B | Pass |
| 7.4 | B | Pass | 7.6 | B | Pass |
| 7.8 | B | Pass | 6.3 | B | Pass |
| 7.8 | B | Pass | 8.2 | B | Pass |
| 9.0 | B | Pass | 5.8 | B | Pass |
| 7.9 | B | Pass | 10.0 | B | Pass |
| 9.3 | B | Pass | 8.4 | B | Pass |
| 9.4 | B | Pass | 7.6 | B | Pass |
| 8.0 | B | Pass | 8.1 | E | Pass |
| 8.6 | B | Pass | 8.3 | B | Pass |
| 7.1 | B | Pass | 9.5 | B | Pass |
| 9.6 | B | Pass | 10.4 | B | Pass |
| 8.3 | C | Pass | 1.5 | A | Fail* |
*Possible anomaly due to poor wire placement.
| Board 1 | Board 2 | ||||
| Pull Strength (gram-force) | Break Mode | Result | Pull Strength (gram-force) | Break Mode | Result |
| 6.7 | B | Pass | 8.1 | B | Pass |
| 7.1 | B | Pass | 7.0 | B | Pass |
| 6.8 | E | Pass | 7.6 | B | Pass |
| 7.4 | B | Pass | 5.9 | B | Pass |
| 8.2 | B | Pass | 7.4 | B | Pass |
| 6.6 | E | Pass | 7.5 | B | Pass |
| Board 3 | Board 4 | ||||
| Pull Strength (gram-force) | Break Mode | Result | Pull Strength (gram-force) | Break Mode | Result |
| 9.2 | B | Pass | 9.3 | B | Pass |
| 9.2 | B | Pass | 9.6 | B | Pass |
| 9.0 | C | Pass | 7.0 | E | Pass |
| 6.7 | B | Pass | 8.1 | B | Pass |
| 5.7 | B | Pass | 8.1 | B | Pass |
| 8.1 | B | Pass | 7.5 | B | Pass |
| Board 5 | Board 6 | ||||
| Pull Strength (gram-force) | Break Mode | Result | Pull Strength (gram-force) | Break Mode | Result |
| 9.5 | B | Pass | 9.4 | B | Pass |
| 9.2 | B | Pass | 9.8 | B | Pass |
| 9.6 | B | Pass | 9.7 | B | Pass |
| 8.0 | B | Pass | 7.9 | B | Pass |
| 7.8 | B | Pass | 8.5 | B | Pass |
| 6.9 | B | Pass | 8.7 | B | Pass |
C. 3 µin of Gold
Before Reflow
| Board 1 | Board 2 | ||||
| Pull Strength (gram-force) | Break Mode | Result | Pull Strength (gram-force) | Break Mode | Result |
| 6.1 | B | Pass | 7.2 | B | Pass |
| 5.9 | B | Pass | 5.3 | B | Pass |
| 6.3 | E | Pass | 7.8 | B | Pass |
| 7.0 | B | Pass | 6.5 | B | Pass |
| 7.1 | B | Pass | 6.5 | B | Pass |
| 6.7 | B | Pass | 7.4 | B | Pass |
| 7.6 | B | Pass | 7.8 | B | Pass |
| 8.3 | E | Pass | 8.8 | B | Pass |
| 8.0 | B | Pass | 8.5 | C | Pass |
| 8.5 | B | Pass | 7.8 | B | Pass |
| 8.0 | B | Pass | 7.5 | B | Pass |
| 8.2 | E | Pass | 9.0 | B | Pass |
| 9.5 | C | Pass | 9.4 | C | Pass |
1st Round of Reflow
| Board 3 | Board 4 | ||||
| Pull Strength (gram-force) | Break Mode | Result | Pull Strength (gram-force) | Break Mode | Result |
| 8.5 | B | Pass | 8.1 | B | Pass |
| 7.1 | B | Pass | 7.4 | B | Pass |
| 8.0 | B | Pass | 5.3 | B | Pass |
| 7.2 | B | Pass | 7.3 | B | Pass |
| 6.6 | B | Pass | 6.7 | B | Pass |
| 7.4 | B | Pass | 5.7 | B | Pass |
| 9.4 | B | Pass | 8.2 | B | Pass |
| 9.0 | B | Pass | 9.1 | B | Pass |
| 6.7 | C | Pass | 8.6 | B | Pass |
| 7.9 | B | Pass | 8.4 | B | Pass |
| 7.5 | C | Pass | 8.5 | B | Pass |
| 8.6 | B | Pass | 8.5 | B | Pass |
| 9.1 | B | Pass | 9.6 | B | Pass |
| Board 1 | Board 2 | ||||
| Pull Strength (gram-force) | Break Mode | Result | Pull Strength (gram-force) | Break Mode | Result |
| 7.7 | B | Pass | 7.8 | B | Pass |
| 7.2 | B | Pass | 8.2 | B | Pass |
| 6.6 | B | Pass | 8.9 | B | Pass |
| 7.5 | B | Pass | 7.9 | B | Pass |
| 7.7 | B | Pass | 7.8 | B | Pass |
| 7.6 | B | Pass | 8.7 | B | Pass |
2nd Round of Reflow
| Board 5 | Board 6 | ||||
| Pull Strength (gram-force) | Break Mode | Result | Pull Strength (gram-force) | Break Mode | Result |
| 7.3 | B | Pass | 7.1 | B | Pass |
| 6.7 | B | Pass | 6.6 | B | Pass |
| 7.8 | B | Pass | 7.3 | B | Pass |
| 7.2 | B | Pass | 7.2 | B | Pass |
| 6.4 | B | Pass | 8.3 | B | Pass |
| 5.0 | E | Pass | 6.5 | B | Pass |
| 9.1 | B | Pass | 8.6 | E | Pass |
| 8.1 | C | Pass | 0.4 | E | Fail* |
| 4.5 | E | Pass | 9.6 | B | Pass |
| 8.5 | B | Pass | 9.2 | E | Pass |
| 8.8 | B | Pass | 9.1 | E | Pass |
| 8.6 | B | Pass | 3.1 | E | Pass |
| 9.4 | B | Pass | 7.9 | B | Pass |
*Possible anomaly due to poor wire placement.
| Board 1 | Board 2 | ||||
| Pull Strength (gram-force) | Break Mode | Result | Pull Strength (gram-force) | Break Mode | Result |
| 4.2 | E | Pass | 9.4 | B | Pass |
| 8.9 | B | Pass | 9.7 | B | Pass |
| 9.3 | B | Pass | 8.1 | B | Pass |
| 8.1 | B | Pass | 7.3 | B | Pass |
| 6.3 | B | Pass | 8.1 | B | Pass |
| 7.1 | E | Pass | 6.9 | B | Pass |
| Board 3 | Board 4 | ||||
| Pull Strength (gram-force) | Break Mode | Result | Pull Strength (gram-force) | Break Mode | Result |
| 8.3 | B | Pass | 6.7 | B | Pass |
| 7.4 | B | Pass | 8.3 | B | Pass |
| 6.8 | B | Pass | 7.2 | B | Pass |
| 6.5 | B | Pass | 8.0 | B | Pass |
| 6.8 | B | Pass | 8.0 | B | Pass |
| 7.2 | B | Pass | 8.4 | B | Pass |
3rd Round of Reflow
| Board 7 | Board 8 | ||||
| Pull Strength (gram-force) | Break Mode | Result | Pull Strength (gram-force) | Break Mode | Result |
| 8.1 | B | Pass | 7.4 | E | Pass |
| 6.2 | B | Pass | 7.6 | B | Pass |
| 7.1 | E | Pass | 8.2 | B | Pass |
| 7.2 | B | Pass | 6.9 | B | Pass |
| 6.6 | B | Pass | 6.9 | B | Pass |
| 7.5 | B | Pass | 6.7 | E | Pass |
| 7.9 | B | Pass | 9.2 | E | Pass |
| 9.1 | B | Pass | 8.2 | B | Pass |
| 9.0 | B | Pass | 9.1 | B | Pass |
| 9.0 | B | Pass | 8.1 | B | Pass |
| 8.7 | B | Pass | 9.4 | B | Pass |
| 9.0 | B | Pass | 9.8 | B | Pass |
| 9.6 | B | Pass | 9.5 | B | Pass |
| Board 1 | Board 2 | ||||
| Pull Strength (gram-force) | Break Mode | Result | Pull Strength (gram-force) | Break Mode | Result |
| 8.8 | B | Pass | 9.1 | B | Pass |
| 8.5 | B | Pass | 8.1 | B | Pass |
| 7.2 | B | Pass | 6.7 | B | Pass |
| 7.6 | B | Pass | 7.3 | B | Pass |
| 7.1 | B | Pass | 6.8 | B | Pass |
| 8.0 | B | Pass | 7.5 | B | Pass |
| Board 3 | Board 4 | ||||
| Pull Strength (gram-force) | Break Mode | Result | Pull Strength (gram-force) | Break Mode | Result |
| 10.1 | B | Pass | 9.3 | E | Pass |
| 9.2 | C | Pass | 8.5 | B | Pass |
| 9.8 | B | Pass | 9.9 | B | Pass |
| 7.9 | B | Pass | 7.2 | B | Pass |
| 5.9 | B | Pass | 8.5 | B | Pass |
| 7.7 | B | Pass | 8.1 | B | Pass |
| Board 5 | Board 6 | ||||
| Pull Strength (gram-force) | Break Mode | Result | Pull Strength (gram-force) | Break Mode | Result |
| 7.3 | B | Pass | 8.2 | B | Pass |
| 8.2 | B | Pass | 8.5 | B | Pass |
| 7.1 | B | Pass | 7.4 | B | Pass |
| 7.5 | B | Pass | 7.9 | B | Pass |
| 6.3 | E | Pass | 7.4 | B | Pass |
| 8.8 | B | Pass | 8.6 | B | Pass |
D. 5 µin of Gold
Before Reflow
| Board 1 | Board 2 | ||||
| Pull Strength (gram-force) | Break Mode | Result | Pull Strength (gram-force) | Break Mode | Result |
| 8.0 | B | Pass | 8.2 | C | Pass |
| 8.2 | B | Pass | 9.4 | C | Pass |
| 8.5 | B | Pass | 8.3 | B | Pass |
| 8.3 | B | Pass | 9.3 | C | Pass |
| 8.7 | B | Pass | 10.2 | C | Pass |
| 8.2 | B | Pass | 8.3 | C | Pass |
| 8.6 | B | Pass | 7.9 | B | Pass |
| 9.9 | B | Pass | 7.0 | B | Pass |
| 7.7 | C | Pass | 8.2 | B | Pass |
| 8.3 | B | Pass | 8.3 | B | Pass |
1st Round of Reflow
| Board 3 | Board 4 | ||||
| Pull Strength (gram-force) | Break Mode | Result | Pull Strength (gram-force) | Break Mode | Result |
| 5.7 | B | Pass | 8.2 | B | Pass |
| 6.2 | B | Pass | 7.1 | B | Pass |
| 3.8 | B | Pass | 5.4 | B | Pass |
| 7.6 | B | Pass | 7.1 | B | Pass |
| 6.7 | B | Pass | 7.2 | B | Pass |
| 6.6 | B | Pass | 7.0 | B | Pass |
| 8.9 | B | Pass | 10.3 | B | Pass |
| 9.7 | B | Pass | 7.8 | B | Pass |
| 9.2 | B | Pass | 9.6 | B | Pass |
| 8.5 | B | Pass | 10.3 | B | Pass |
| 10.0 | B | Pass | 7.7 | B | Pass |
| 8.8 | B | Pass | 9.1 | B | Pass |
| 9.2 | B | Pass | 10.2 | B | Pass |
| Board 1 | Board 2 | ||||
| Pull Strength (gram-force) | Break Mode | Result | Pull Strength (gram-force) | Break Mode | Result |
| 6.6 | B | Pass | 6.4 | B | Pass |
| 7.9 | B | Pass | 8.0 | B | Pass |
| 7.2 | B | Pass | 8.1 | B | Pass |
| 6.7 | B | Pass | 7.0 | B | Pass |
| 8.1 | B | Pass | 6.9 | B | Pass |
| 7.5 | B | Pass | 6.5 | B | Pass |
2nd Round of Reflow
| Board 5 | Board 6 | ||||
| Pull Strength (gram-force) | Break Mode | Result | Pull Strength (gram-force) | Break Mode | Result |
| 7.8 | B | Pass | 7.8 | B | Pass |
| 8.2 | B | Pass | 8.4 | B | Pass |
| 7.9 | B | Pass | 8.3 | B | Pass |
| 6.7 | B | Pass | 6.5 | B | Pass |
| 6.6 | B | Pass | 7.7 | B | Pass |
| 7.6 | B | Pass | 7.0 | B | Pass |
| 8.3 | C | Pass | 9.2 | B | Pass |
| 9.2 | C | Pass | 10.2 | B | Pass |
| 9.2 | B | Pass | 8.6 | B | Pass |
| 9.0 | B | Pass | 8.6 | B | Pass |
| 9.5 | B | Pass | 9.1 | C | Pass |
| 7.7 | B | Pass | 8.0 | B | Pass |
| 11.2 | B | Pass | 10.3 | C | Pass |
| Board 1 | Board 2 | ||||
| Pull Strength (gram-force) | Break Mode | Result | Pull Strength (gram-force) | Break Mode | Result |
| 9.8 | B | Pass | 9.1 | B | Pass |
| 8.5 | B | Pass | 8.9 | B | Pass |
| 9.8 | B | Pass | 9.2 | B | Pass |
| 8.2 | B | Pass | 7.9 | B | Pass |
| 7.2 | B | Pass | 7.3 | B | Pass |
| 6.8 | B | Pass | 7.7 | B | Pass |
| Board 3 | Board 4 | ||||
| Pull Strength (gram-force) | Break Mode | Result | Pull Strength (gram-force) | Break Mode | Result |
| 6.9 | B | Pass | 7.4 | B | Pass |
| 9.1 | B | Pass | 8.7 | B | Pass |
| 7.0 | B | Pass | 6.6 | B | Pass |
| 6.2 | B | Pass | 8.4 | B | Pass |
| 7.3 | B | Pass | 8.2 | B | Pass |
| 8.0 | B | Pass | 8.1 | B | Pass |
3rd Round of Reflow
| Board 7 | Board 8 | ||||
| Pull Strength (gram-force) | Break Mode | Result | Pull Strength (gram-force) | Break Mode | Result |
| 7.3 | B | Pass | 8.0 | B | Pass |
| 7.5 | B | Pass | 8.2 | B | Pass |
| 8.2 | B | Pass | 7.0 | B | Pass |
| 7.5 | B | Pass | 7.2 | B | Pass |
| 7.5 | B | Pass | 7.7 | B | Pass |
| 6.8 | B | Pass | 7.0 | B | Pass |
| 9.2 | B | Pass | 9.0 | C | Pass |
| 9.1 | B | Pass | 8.3 | C | Pass |
| 5.5 | B | Pass | 9.5 | C | Pass |
| 8.9 | B | Pass | 8.8 | B | Pass |
| 8.5 | B | Pass | 9.1 | B | Pass |
| 9.7 | B | Pass | 6.7 | C | Pass |
| 9.9 | E | Pass | 10.2 | B | Pass |
| Board 1 | Board 2 | ||||
| Pull Strength (gram-force) | Break Mode | Result | Pull Strength (gram-force) | Break Mode | Result |
| 7.4 | B | Pass | 8.4 | B | Pass |
| 8.6 | B | Pass | 7.3 | B | Pass |
| 8.6 | B | Pass | 7.3 | B | Pass |
| 7.1 | B | Pass | 8.2 | B | Pass |
| 8.2 | B | Pass | 8.2 | B | Pass |
| 7.0 | B | Pass | 6.1 | B | Pass |
| Board 3 | Board 4 | ||||
| Pull Strength (gram-force) | Break Mode | Result | Pull Strength (gram-force) | Break Mode | Result |
| 10.3 | B | Pass | 10.3 | B | Pass |
| 8.8 | B | Pass | 8.9 | B | Pass |
| 9.5 | B | Pass | 8.6 | B | Pass |
| 7.0 | B | Pass | 8.0 | B | Pass |
| 8.6 | B | Pass | 8.6 | B | Pass |
| 7.1 | B | Pass | 6.4 | B | Pass |
| Board 5 | Board 6 | ||||
| Pull Strength (gram-force) | Break Mode | Result | Pull Strength (gram-force) | Break Mode | Result |
| 10.3 | E | Pass | 8.1 | B | Pass |
| 9.9 | B | Pass | 9.7 | B | Pass |
| 8.6 | B | Pass | 9.8 | B | Pass |
| 7.2 | B | Pass | 5.0 | B | Pass |
| 8.9 | B | Pass | 8.4 | B | Pass |
| 8.2 | B | Pass | 8.7 | B | Pass |
The objective of these gold wire bonding tests was to determine if multiple rounds of reflow had detrimental effects on the surface condition of the gold plating. As reflected in the graph below, reflow had no severe impact on the gold plating as all of the wire bond values, with the exception of a few anomalies, was passing.
Most notably at lower gold thicknesses (especially 1 µin), the wire bond pull values were higher overall, even after three rounds of reflow. When the gold is thicker, oxygen will have a higher chance of penetrating the porous gold and oxidizing the nickel, especially with the accelerating force of the heat from the reflow process. As a result, the bondability and surface condition of the plating surface could be negatively affected. An example of this can be shown below in which the wire bond values at high gold thicknesses were more inconsistent after each reflow.
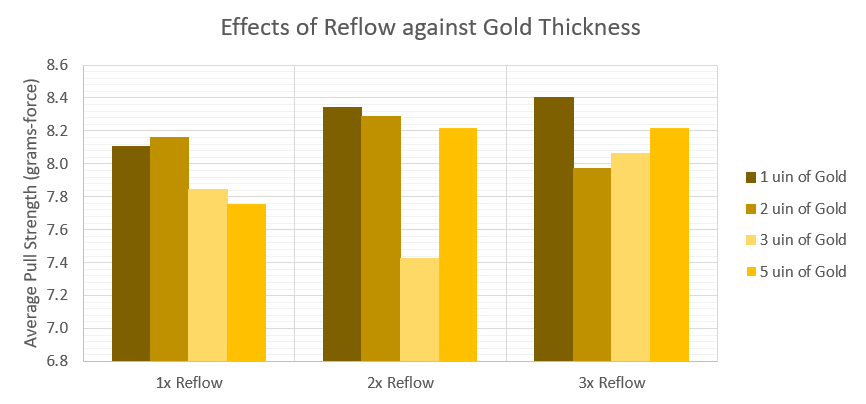

As evident from this series of tests, multiple rounds of reflow do not appear to negatively impact the bondability of the gold plating. However, while the reflow process does not seem to affect the surface condition of the gold, the gold thickness should be kept to a minimum (1.2 ± 4σ µin per IPC-4556) if better bondability is desired.
In conclusion:
- Reflow does not negatively affect gold wire bonding regardless of the gold thickness.
- Incoming boards can safely undergo reflow at assembly up to three times without any negative results.
About Rahul Shashikanth : Rahul Shashikanth is an electronics and communication engineer with over 8 years of experience in publishing technical articles on PCB design, manufacturing, and assembly. He is currently the content marketing manager at Sierra Circuits.